| Chapter 1 - Installation
The setup of the Mava Multimedia Suite consists of three steps. The first step is the installation of Java, the second one the installation of the Mava Multimedia Suite itself, and the last one the installation of the extensions for the authoring system, which is necessary for its use.
1.1 Installation of Java
Basically there are two ways to install Java applications. Either you can use a full installer, which automatically installs a complete Java runtime environment and the application, or you'll use alternative ways, e.g. Java Web Start, which in fact requires an installed Java but you can use it for several Java applications. For MMP and MMEd Java Web Start was chosen as deployment tool. That means that a Java Runtime Environment has to be installed on your system at first, if you do not have it yet. Then you are able to install both applications in a very simple way by activating a link on this Internet site.
Meanwhile, both applications are adapted to JRE (Java Runtime Environment) 1.4. It is recommended to use this JRE version, since it has some advantages. It includes the Java API for XML Processing (JAXP), for instance, and you have no effort to install this API manually.
The following programs come with a standard Windows installer and can be installed in an accordingly easy way. As well it is possible to execute the programs on a Linux or Sun Solaris platform. Use the following links to get to the pages of the Java homepage of Sun Microsystems, which offer accordant download opportunities.
After installing all packages, you can use this Installations-Test-Applet to verify your installation.
1.1.1 JRE 1.4.1 [Windows] [Linux]
From this web page you can download a version of JRE which is compatible to your platform. Afterwards you can install JRE, e.g. by double-clicking on the downloaded file. JRE version 1.4.0 and later will install Web Start automatically.
If your web browser has not registered Java Web Start as helper application you have to do this manually. For this choose "Edit" -> "Properties" from the menu and select the auxiliary application. There must be an entry for Java Web Start [application/x-java-jnlp-file]. If not, you must register it. Select "Add type". The MIME type is application/x-java-jnlp-file, the file extension is ".jnlp" and the application is "javaws.exe".
1.1.2 JMF 2.1.1 [Windows]
[Linux
Version]
Here you've to choose and to install a version for a JRE. This process will run automatically; all you have to do is to download the setup file and to execute it by double-clicking.
1.1.3 JAI 1.1 [Windows]
[Linux]
Here a version for a JRE has to be chosen and installed, too.
1.2 Installation of the Mava Multimedia Suite
The installation of the MAVA Multimedia Suite is quite simple, since it will be accomplished by Java Web Start automatically. We will now discuss the most important aspects of the installation, so that you can handle the installation by yourself. The installation of a Java Web Start application is started by selecting a link on a web page. For MMP you can find the link on this page and for MMEd on this page. Before the application is installed, you will be asked if you would like to do this. Additional applications are provided with a certificate (a signed, albeit no trusted one). This is necessary, since applications have to load extensions and to open documents, which are stored locally.
After installing, you have three possibilities to start the applications:
1. Click on a link provided on this web site.
2. Use the menu of Java Web Start
3. Create an entry in the start menu or a desktop shortcut and use this.
In case there is a new version of application on the server, Java Web Start will download and install it. This automatism as well as the Internet integration is another advantage of using Java Web Start.
1.3 Installation of Extensions
Before you can start editing documents you've to add media items and operators to the authoring system. For that reason you've to download the MMEd extensions. You can download them
here. Download the MMEd extensions as zip file and unpack them into any temporary directory. Later the authoring system will move the extensions into the correct directory and you can delete the temporary directory.
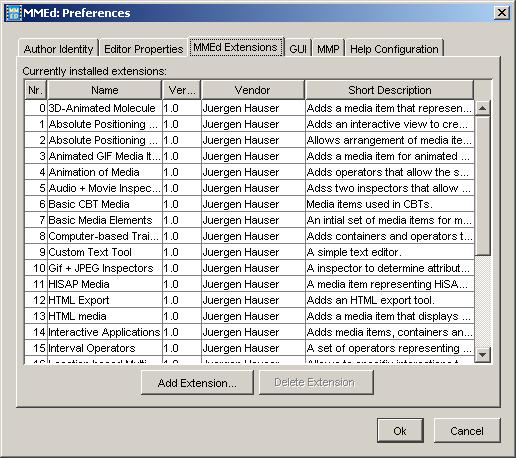
Start MMEd and call the properties dialog using the File menu. Then select the tab "MMEd Extensions". The dialog should look as in the following illustration; the extension list will still be empty.
In this dialog you can add the extensions you've downloaded before to the authoring system by clicking the Button "Add extensions...". On pressing the button a file selection dialog opens; go to the directory, in which you've unpacked the extensions before. Here you can select the extension files you wish to add to the authoring system. Click on "OK" to close the selection dialog. Now, the authoring system will need some time to analyze and add the extensions. Hereafter, the table "Installed extensions" in the dialog contains several entries (compare with the previous screenshot).
If you managed to install the extensions, your system is ready for action. Now, you can go to the next chapter and learn how to create and play back a multimedia document with the Mava Multimedia Suite.
|